
- Section: Intro
- Section: Features
- Section: Portfolio
- Section: Testimonials
- Section: Team
- Section: Contact
- Section: Blog
- Section: Static Content
The true power and flexibility of Meth, lies in the custom widgets. Using these you will create and control the appearance of your homepage. Custom widgets are highlighted in blue for your convenience. Custom widgets with the “Section:” prefix can be used at widgetized pages, and they output entire sections.
This is the widget configuration we are using in our demo:
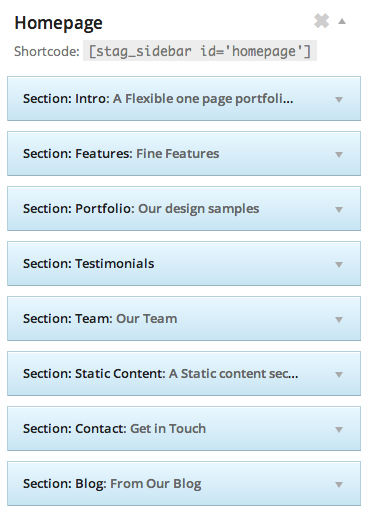
Now let’s have a look at what each of the widgets does.
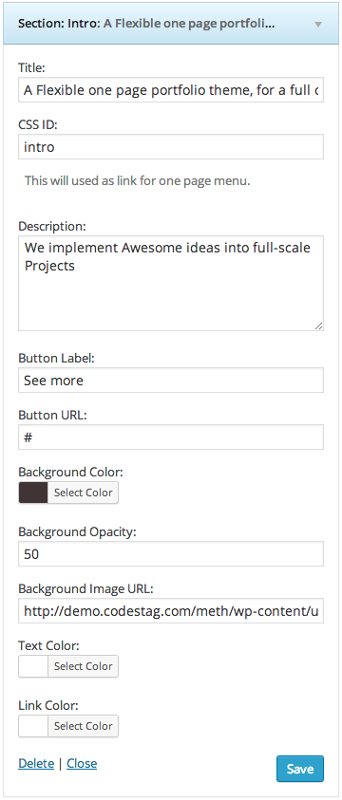
Section: Intro
This should be the first widget that you will use. Using this widget first in order will output an intro section with a parallax image and a title, a description and a call to action button. This area as you see is completely customizable. Use the settings to create a jaw dropping introduction section for your site, and direct the visitors to an action utilizing the button.
Get creative by setting an opacity to the background image and achieve the desired contrast form your typography by using a dark background color.
Section: Features
This handy widget is useful if you want to output a section for the services you provide, or the features of your product. There is an option to choose the number of columns where your features will appear.

So, using the Section: Features widget will output the features section. But where shall you define which features/services you provide? Let’s see how this works.
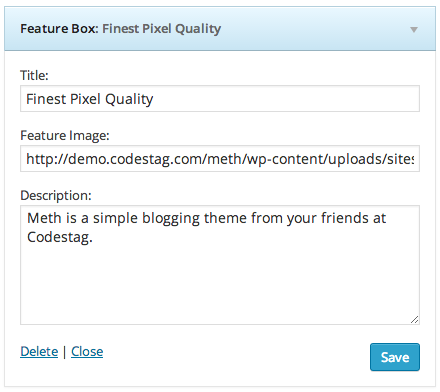
At the widgets page you will see a dedicated widget section named “Features”. In this widget section, you should only put “Feature Box:” widgets, and each of these widgets will represent an individual service/feature:

There is a number of options that you can configure for each Feature box such as the title, description and an image/icon.
Section: Portfolio
This widget will show the portfolio section. You can also choose how many portfolio items you want to show at the homepage.

Section: Testimonials
This simple widget outputs the testimonials at your homepage. Nothing fancy to configure here as it will just rotate the testimonials you have created under the Testimonials tab at your admin side.

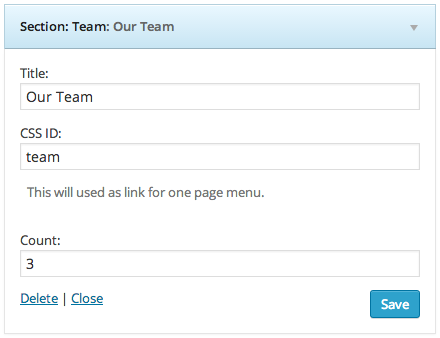
Section: Team
The Section: Team widget will show the team members that you have created under the Team tab at your admin side.
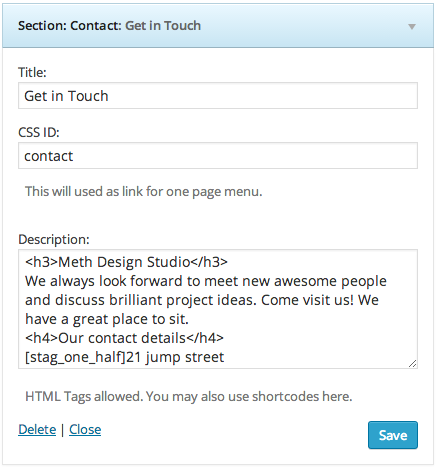
Section: Contact
The Section: Contact widget creates a section with a contact form and some contact details, in case you want to present those to your visitors at the homepage.
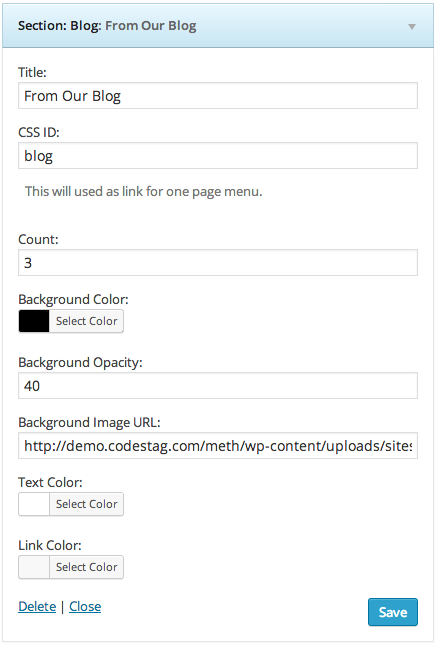
Section: Blog
This widget shows your latest posts from the blog section. Through this widget you can choose a background image, opacity and background color for the section. The image also has a subtle parallax effect applied to it.
Section: Static Content
This widget outputs the content of a specific static page, using a subtle parallax image at the background. You can add as many static content sections as you want at the layout. Let’s try to add one now.
First you have to create the content at a new page. Go to Pages> Add New and create a new page. Create the content you wish and save it. Now let’s return to the widgets area. Drag the Section: Static Content widget to the panel that you use for your homepage. Give the section a title and from the “Select page” dropdown select the page you just created. Hit save and you are good to go.
Through this widget you can also choose a background image, opacity and background color for the section. The image also has a subtle parallax effect applied to it.
