Atik is fully compatible with the WordPress live customizer. All the theme related options reside there so you can have control over your site’s customization from one central place.
Panels Quick view
Under Appearance> Customize you will be able to manage the majority of the theme settings. Options related to the theme layout can be found in subcategories under the theme options tab. For now, let’s take a quick look at the Customizer panel.

Site Identity
Under the Site identity tab you will be able to set up your custom logo. There are times that based on your design options, your logo will show over a coloured or image background. For such cases there is a specific option to upload 2 versions of your logo. One for white, clean background, and another one for the case of a background image.
Colors
Under colors you will be able to set your color palette for various design elements such as footer colors, labels etc.
Fonts
Conveniently select a font for headings and body text, from Google’s web font collection.
Header Media
Atik fully supports a header image or video header. Under this tab you can easily select an image to be used as a background or add your self-hosted video or youtube link. On top of that you have the option to add a custom message, with two separate fields for heading and description, plus a button.
Background image
This panel allows you to select a background image for your theme. As you may have already noticed at large desktop displays, the layout of Atik is actually boxed. You can add a background image here and add a touch of character to enhance the experience.
Menus
Under the Menus tab you can setup your menus. Atik has 5 Menu locations. Setting up your menus is standard to all WordPress themes and is described in detail at the official WordPress documentation:
https://codex.wordpress.org/WordPress_Menu_User_Guide
https://codex.wordpress.org/WordPress_Menu_User_Guide
A special feature of Atik is the social menu. At that menu, adding a raw url to your social profile will output the related social icon to the right side of the top part of your header.
Content Options
Under this tab you can customise the appearance of your post meta info such as date, author etc. Atik has 3 blog layouts so feel free to experiment with combinations.
Theme Options Panel
The theme options panel is where the main customisation options exist. Let’s see each panel tab in detail.
Shop Settings
Shop Header Image
Category pages can optionally have a header with a background image (this is where the two logo options under the Site Identity panel tab come handy). This section allows you to customise the appearance of the header image by blending it’s opacity with a solid color background.
Category pages can optionally have a header with a background image (this is where the two logo options under the Site Identity panel tab come handy). This section allows you to customise the appearance of the header image by blending it’s opacity with a solid color background.
Layout
There are two built in styles for displaying the products at the category pages. Switching to these two styles should take effect instantly at the customizer so you can check each style on the fly. For best mobile experience, the theme loads the first style only for mobile devices.
There are two built in styles for displaying the products at the category pages. Switching to these two styles should take effect instantly at the customizer so you can check each style on the fly. For best mobile experience, the theme loads the first style only for mobile devices.
Columns
You have the ability to select a number of columns for the category pages. If you want to use a sidebar, you can choose have 3 columns plus the additional sidebar column.
You have the ability to select a number of columns for the category pages. If you want to use a sidebar, you can choose have 3 columns plus the additional sidebar column.
Other Options
These are some additional straight-forward options regarding the appearance of related and up-sell products and the visibility of the “add to cart” button at the category pages.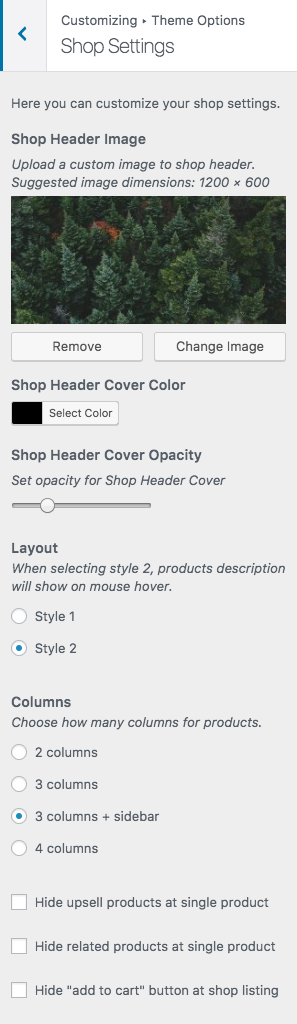
These are some additional straight-forward options regarding the appearance of related and up-sell products and the visibility of the “add to cart” button at the category pages.
Blog Layout
Layout
Atik offers three layout options to display the posts at the blog page. Again you should be able to switch between the layouts and see the effect on the fly.
Atik offers three layout options to display the posts at the blog page. Again you should be able to switch between the layouts and see the effect on the fly.
Single Post / Page Style
Additionally you can choose between 2 styles for displaying the featured image at the single posts and pages.
Additionally you can choose between 2 styles for displaying the featured image at the single posts and pages.
Excerpt Length
Layouts 1 & 2 show the excerpt of the post. This field lets you define the excerpt length in number of words.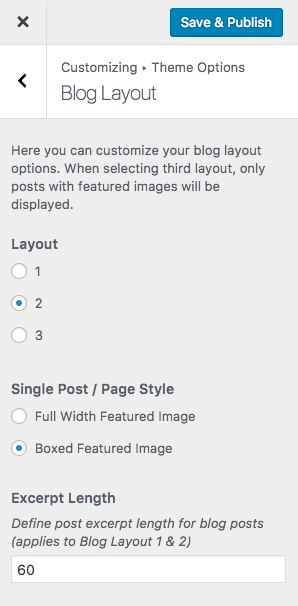
Layouts 1 & 2 show the excerpt of the post. This field lets you define the excerpt length in number of words.
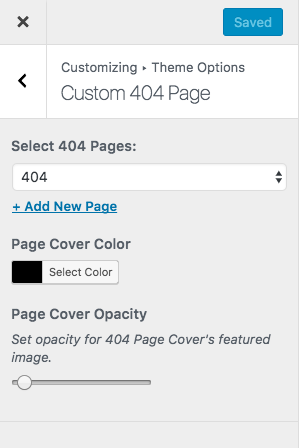
Custom 404 Page
Easily create a custom 404 page that your visitors will land on. Follow the steps below:
- Create a static page, and give it a relevant name. The Page title will appear as the main message at the 404 page template.
- Add a featured image to the page, this image will become the age background. Add any content you wish, then hit Publish.
- Under Appearance > Customize > Theme Options > Custom 404 Page and select the page you just created from the dropdown. You can also adjust an overlay color and opacity to fine-tune the contrast between the image and the text.
- In order to see the design of the custom 404 page, you need to type a link at your site that is simply wrong. For example www.yoursite.com/nothingliveshere