
Let’s set the Blog Page. First step is to create a New Page.
Go to
Pages > Add new and create a New page. Give it a name e.g. “Blog” or “Blog Entries”. Hit the Publish button on the top right.
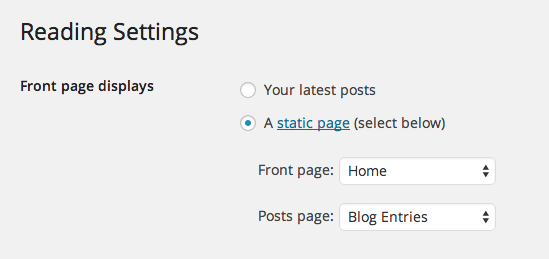
Next step is to assign this page as the page that displays the posts. Go to Settings > Reading and from the first set of radio buttons, check the “A Static page” and from the Posts Page dropdown select the page you have created, like at the screenshot below. Do not worry about the Front Page dropdown for now, we will work on this later. Click Save and you are good to go.
Now you can create posts the normal way. If you want to assign the blog to the main navigation menu, you must put the page you just created at the menu.
Custom Header Settings for the Blog page.
If you want to give a custom title, subtitle and background image to the blog page, please note that you should not do it at the Custom Header Settings Panel. For the Blog page specifically, these settings are controlled by the theme options. Navigate to Cluster > Theme Options > Site settings. Under this tab you can edit the header settings that you want to appear at the header of your blog page.
Setting the “Continue Reading” Link for posts
At the blog page, you will see that each post has a short description under it, and there is a Continue Reading link that leads you to the full post page. In order to define this “breakpoint” you must use the Insert More Tag button which is located at the text editor, as highlighted at the screenshot below.

Place the cursor to the point of the content where you wish to show the Continue Reading link, and click on the button shown at the above screenshot.